
When I wanted to create a header image for a wordpress website I was seriously struggling. I don’t have a fancy graphics programme like photoshop. I didn’t have the ability or knowledge of how to use one even if I did buy it.
Then I discovered Pixlr.com
Pixlr is a free online image editor. It has a “help” facility and also FAQs. So lets get going!
Let’s say we want to make a killer header for the WordPress Theme 2014. The recommended size being 1260 pixels wide and 240 high. Start by opening Pixlr in another tab or window.
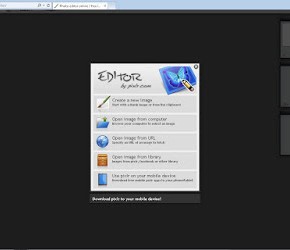
The start menu above gives you 4 options. Pick the first one to “Create a New Image“. Give your image a title and define the Width to 1260 and the Height to 240. If you have a background colour to your site that you want to show through at any point then tick the “transparent” box; otherwise you can leave it blank.
You now have a blank canvas on which to play with images and tools. So let’s have something to aim for…

I started with opening an image from a website as a new layer through the “Layer” menu (top). This allowed me to then move the image around with the “Move Tool” until I had it where I wanted.

The next image I want to use is too small and the skier is on the wrong side. Here is the URL “http://www.skibreezy.com/wp-contents/uploads/2014/03/Back-bowls-19.jpg“. This one I need to open as a new image; resize it; flip it horizontally and then paste it into a new layer on the banner.

Next we are going to blur the images. To achieve this you need to select the “Eraser tool” from the tool box on the left. As you select it you will see a new toolbar appear at the top with the Eraser tool at the left hand side. Next to that is the Brush style. Click the image to the right of “Brush” and a new dialogue box comes up with all the different styles available. We want the 150 diameter one in the 1st row down with the fuzzy edges. Make sure you have the layer selected with the skier on the right and you are going to run the Eraser down the left had side of the image. This will reveal the image below and create a fade between the two.

Don’t worry if you mess it up. You can undo your attempt and have another go. Either use “Edit” menu and select “Undo” or use the keyboard + .
Lastly we wanna add some text. Select the “Type tool” from the toolbox and click the header image where you want text. Type the text into the box, select the font you want, the size, the colour and alignment and hit the OK button. I chose Mistral, 64pt, Regular, black with center alignment.
Once the text is in, go back to the toolbox and select the “Move tool” to allow you to pick up the text and put it where you want it.
Finally save the file to your hard disc. On the top menue select “File” and then “Save“. in the dialogue box you can rename it, choose where to save it and which file format you want. Note – if you want some of the background of your site to show through the image select PNG as the file type. There is also a “quality” slider which affects the image quality and file size. A reasonable file size for a header is around 180kb.
Hopefully this has given you enough to create a killer header of your own for your WordPress website.


If you are struggling with how to make your website do what you want, talk to me. Between us we can work it out.
© 2021, Alun Barrett. All Rights Reserved.
This website is being looked after by
| Cookie | Duration | Description |
|---|---|---|
| cookielawinfo-checbox-analytics | 11 months | This cookie is set by GDPR Cookie Consent plugin. The cookie is used to store the user consent for the cookies in the category "Analytics". |
| cookielawinfo-checbox-functional | 11 months | The cookie is set by GDPR cookie consent to record the user consent for the cookies in the category "Functional". |
| cookielawinfo-checbox-others | 11 months | This cookie is set by GDPR Cookie Consent plugin. The cookie is used to store the user consent for the cookies in the category "Other. |
| cookielawinfo-checkbox-necessary | 11 months | This cookie is set by GDPR Cookie Consent plugin. The cookies is used to store the user consent for the cookies in the category "Necessary". |
| cookielawinfo-checkbox-performance | 11 months | This cookie is set by GDPR Cookie Consent plugin. The cookie is used to store the user consent for the cookies in the category "Performance". |
| viewed_cookie_policy | 11 months | The cookie is set by the GDPR Cookie Consent plugin and is used to store whether or not user has consented to the use of cookies. It does not store any personal data. |